UI Library
Framework vs Library
A library is called by our code, while a framework calls our code. The difference is where the control is. In a library our code controls which function runs when. In a framework the framework has the control and decides which functions to call.
Web Components
To create your own html tag, a class can be created which extends from HTMLElement and then use attachShowdow({mode: 'open'}) to create a shadow DOM (if mode is set to open then JS code outside of the element can access it. If, however, it is set to closed then only the element itself can access the shadow DOM). With the property shadowRoot of the element, code can access the shadow DOM.
The shadow DOM ensures that JS, HTML and CSS inside the shadow DOM are isolated from the main code.
The register the web component the following method customElements.define(<tag-name>, <tag-class>) needs to be called to register the component with the browser.
class CustomProgressBar extends HTMLElement {
  constructor() {
      super();
      const shadowRoot = this.attachShadow({mode: 'open'});
      shadowRoot.innerHTML = `
          <style>
              :host {
                display: inline-block;
                width: 5rem;
                height: 1rem;
              }
              .progress {
                display: inline-block;
                position: relative;
                border: solid 1px #000;
                padding: 1px;
                width: 100%;
                height: 100%;
              }
              .progress > .bar {
                background: #9cf;
                height: 100%;
              }
              .progress > .label {
                position: absolute;
                top: 0;
                left: 0;
                width: 100%;
                text-align: center;
                font-size: 0.8rem;
                line-height: 1.1rem;
              }
          </style>
          <div class="progress" role="progressbar" aria-valuenow="0" aria-valuemin="0" aria-valuemax="100">
              <div class="bar" style="width: 0px;"></div>
              <div class="label">0%</div>
          </div>
      `;
      this._progressElement = shadowRoot.querySelector('.progress');
      this._label = shadowRoot.querySelector('.label');
      this._bar = shadowRoot.querySelector('.bar');
  }

  static get observedAttributes() { return ['value']; }

  // is called by the browser if attributes are added, removed or modified
  attributeChangedCallback(name, oldValue, newValue, namespaceURI) {
      if (name === 'value') {
          const newPercentage = newValue === null ? 0 : parseInt(newValue);
          this._progressElement.setAttribute('aria-valuenow', newPercentage);
          this._label.textContent = newPercentage + '%';
          this._bar.style.width = newPercentage + '%';
      }
  }

  get progress() { return this.getAttribute('value'); }
  set progress(newValue) { this.setAttribute('value', newValue); }
};


customElements.define('custom-progress-bar', CustomProgressBar);
SJDON/SUIWEB
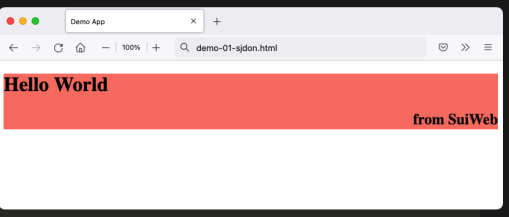
The following is an example of SJDON:
const element =
    ["div", {style: "background:salmon"},
        ["h1", "Hello World"],
        ["h2", {style: "text-align:right"}, "from SuiWeb"] ]
/*
Equivalent of:
<div style="background: salmon">
    <h1>Hello World</h1>
    <h2 style="text-align: right">from SuiWeb</h2>
</div>
*/
States
With states, a component can access and set a state. A state is initialised with useState(stateName, key, initialValue) which returns two values in an array. stateVar is a variable to access the current value (not a function) and setStateVar is a function to update the state and rerender the component. In SUIWEB the setState(setFun, update) function takes a function which is called by the setState() function. If the update parameter is false then no rerending is done.
The following is an example simulating a slow network speed:
const App = () => {
    let initialState = {
        heading: "Awesome SuiWeb (Busy)",
        content: "Loading...",
    }
    // stateName = "name", key = 1, the inititial state is {heading: ...}
    let [state, setState] = useState("state", 1, initialState)
    let [timer, setTimer] = useState("timer", 1, null)

    // setTimeout returns an timeout id, which is set as the state of timer
    const startTimer = () => setTimeout(() => {
        setState(() => ({
            heading: 'Awesome SuiWeb',
            content: 'Done!',
        }))
    }, 3000)
    if (!timer) setTimer(startTimer, false)
    const { heading, content } = state
    return (
        ["main",
            ["h1", heading],
            ["p", content] ]
    )
}
The following example shows a basic counter component which increments every second:
const Counter = (props) => {
    let [count, setCount] = useState("mycounter", props.key, props.count)
    let [timer, setTimer] = useState("mytimer", props.key, null)
    if (timer) clearTimeout(timer)
    setTimer(() => setTimeout(() => setCount(n => n+1), 1000), false)
    return (
        ["p",
         {style: "font-size:2em", onclick: () => setCount(n => n + 1)},
         "Count ", count ]
    )
}

const App = (props) =>
    ["div",
        [Counter, {count: 1, key: 1}],
        [Counter, {count: 4, key: 2}],
        [Counter, {count: 7, key: 3}] ]
Controlled Input
In the following example a textfield is created and on each key typed the states are updated. This setup can be used to for example only allow numbers or other restrictions. Because of this, it is called controlled input.
If a state is of an input field is only updated when certain condition is met then it is vital to also set the old state if the condition is not met, otherwise no rerender is triggered and input field has the wrong type which the user typed still in it.
const App = ({init}) => {
    let [text, setText] = useState("myTextInput", 1, init)
    let [otherText, setOtherText] = useState("myOther Text", 1, "")

    const updateValue = e => {
        const value = e.target.value
        const reg = /^\d+\.?\d*$/
        // !in both cases a rerender is triggered!
        if(reg.text(value)) setText(() => value)
        else setText(old => old)
    }
    const updateOtherValue = e => {
        // do validation here
        setOtherText(() => e.target.value)
    }
    useEffect(() =>     document.querySelector("h1").text = "hdfa")

    return (
        ["div", {style: "background: lightblue"},
            ["h1", "Controlled Input Elements"],
            ["input", {oninput: updateValue, value: text}],
            ["p", "Your input: ", text ],
            ["textarea", {oninput: updateOtherValue}, otherText],
            ["p", "Your input: ", otherText ] ] )
}

const element = [App, {init: "Name"}]
Container Component
A container component wraps another component and provides the data. This ensures that the wrapped component is only concerned with the UI and not fetching and managing date. Instead the container component does this and the concerns are separated and, additionally, the UI component is more reusable.
Effect Hook
Effect hooks are executed after the componente has been rendered. Effect hooks can be used to execute side effects, like manipulating the DOM.
const MyContainer = () => {
    // after the component has been rendered, set h1 to "hello"
    useEffect(() => {
        document.getElementById("test").text = "hello"
    })
    return (
        ["h1", {id: "test"}], "moin")
}
Splitting Applications into Components
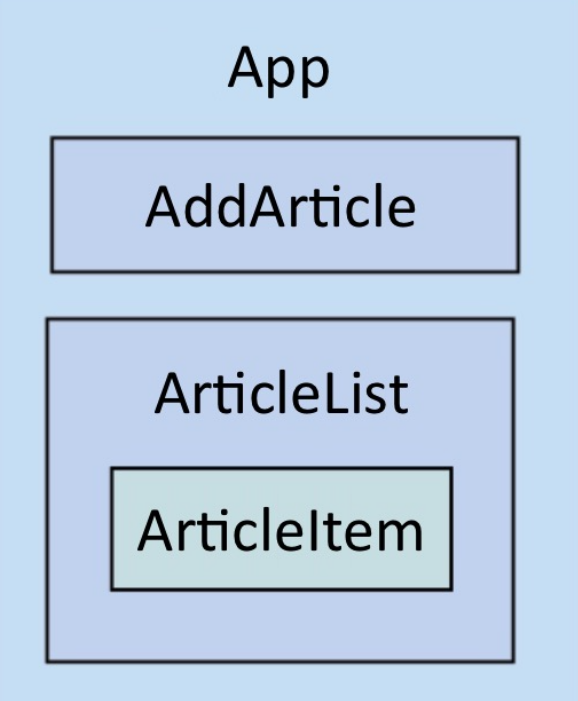
The state of the application (or part of the application) should be concentrated in one top component. All children and children of children receive the current state via property and update the state with listeners.
In the following example the App component "owns" the state and passes it down to its components, like AddArticle and ArticleList. The AddArticle list will inform the App about adding an article with the listener onClickAdd.
The title and summary textbox in the AddArticle component are controlled inputs with states in the App component.
const App = () => {
    let initialState = {
        articles: [
            {
                id: cuid(),
                title: 'Article 1',
                summary: 'Article 1 Summary',
                display: 'none',
            },
            ...
        ],
        title: '',
        summary: '',
    }
    let [state, setState] = useState("state", 1, initialState)
    const onChangeTitle = e => setState((s) => ({...s, title: e.target.value}))
    const onChangeSummary = e => { ... }
    const onClickAdd = e => { ... }
    const onClickRemove = (id) => {
        let articles = state.articles.filter(a => a.id != id)
        setState((s) => ({...s, articles}))
    }
    const onClickToggle = (id) => { ... }

    return (
        ["section",
            [ AddArticle , {
                name: "Articles",
                title: state.title,
                summary: state.summary,
                onChangeTitle,
                onChangeSummary,
                onClickAdd,
            }],
            [ ArticleList , {
                articles: state.articles,
                onClickToggle,
                onClickRemove,
            }] ]
        )
}

const AddArticle = ({name, title, summary, onChangeTitle, onChangeSummary, onClickAdd}) => {
    return (
        ["section",
            ["h1", name],
            // controlled input
            ["input", { placeholder: "Title", value: title,
                oninput: onChangeTitle }],
            // controlled input
            ["input", { placeholder: "Summary", value: summary,
                oninput: onChangeSummary }],
            ["button", { onclick: onClickAdd }, "Add"] ]
    )
}
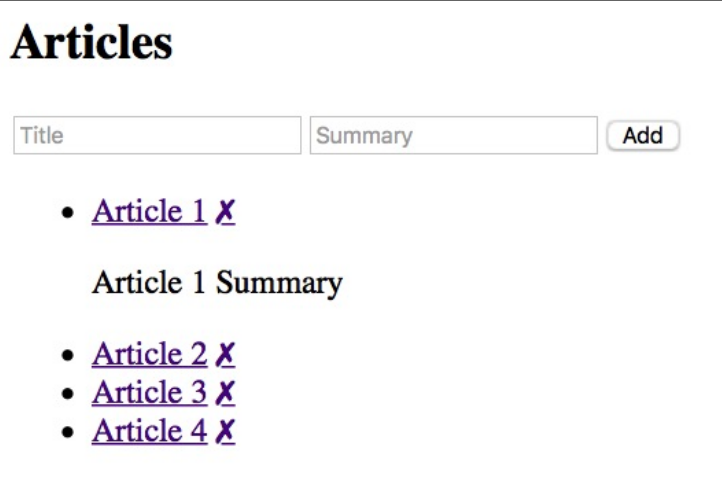
The code above produces the following web page: